Let’s play chess in Pega
2019-05-31
Communicating with Pega through Facebook Messenger
2019-12-19
Business Case
A lot of organizations, including us at Saltech Consulting, use Asana to help manage their internal affairs. We also use Pega to manage some of our internal business processes. For users that aren’t using our internal Pega application on a daily basis, we had to create tasks in Asana so that they’re aware when they have something to do in the app. Fortunately, Asana isn’t only available through their User Interface, they also have a pretty well-rounded API* so it can easily be integrated into a Pega application.
*Creating tasks via email is also possible in Asana. The upside to this is adding attachments is possible, the downside is that you can’t set a due date. For our purposes, the due date is more important because of the reminder notifications.
The Problem
Normally, for this purpose, we would make a REST Connector with an OAuth 2.0 Authentication Profile that uses an OAuth 2.0 Provider. However, in our case, this was not an optimal solution and I’ll explain why.
In Pega, when you set up an OAuth Provider you can choose between three grant types:
The password credentials type is only advisable when you completely trust the API provider because it’s your user credentials that are exchanged directly for a token.
The client credentials type is used when you want to establish a server-to-server connection and don’t need a user to be logged into the application you are connecting to. This would be ideal for us but unfortunately, the Asana API doesn’t support this grant type.
According to Pega Help, with the authorization code grant type, your application submits an authorization code request to the external application that you want to connect to. The authorization server of the external application validates the credentials in the request and then authenticates you via your user credentials to produce an authorization code. This is the only grant type supported by the Asana API and there are two major issues with this.
Issue 1) Since with the authorization code you need a user to be logged in to Asana, the way Pega interprets/solves this is that it stores the token with the operator’s ID who first requested it attached to the token. So on the Pega side, every operator that wants to use the functions the REST Connector provides has to connect individually. However, on the Asana side, the registered application is under one user’s name so all operators should be able to use it in that one Asana user’s name.
Issue 2) Pega has this bug that it doesn’t refresh the token after the second time: https://community1.pega.com/community/pega-support/question/refresh-token-not-working-integrating-google-api-using-oauth-20 For us, it was quite random, sometimes it worked for days, other times it really disconnected after the second refresh. It is supposedly fixed in 8.3, but for now, you have to reconnect quite regularly, for which there is no OOB solution.
The Workaround
Fortunately, however, besides the OAuth authentication, Asana provides a Personal Token too, which doesn’t expire. The downside is that with this option everything that our application does inside Asana will be made in the name of the user whose personal token is used. In our case it was not a deterring factor, it was not a requirement that we should have different users in Asana, only that it is possible to give out tasks to anyone within a certain team in the organization.
Now, this is a much less secure way than it would have been with OAuth 2.0 since we are sending the same token with every request. The measures I was able to take to make it a bit more secure were to encrypt the token itself which thus has to be decrypted everywhere the connector is called.
As you can see the token is also called from a Dynamic System Setting so it can be changed later.
The Implementation
So now that we have the authentication down, let’s see the actual implementation. First, we need to ask for a Personal Token from Asana (or register an application) in the Developer Console: https://app.asana.com/0/developer-console. Then, in Pega, we need a REST Connector. It’s best to use the Wizard for this because it will also generate the necessary classes and properties. In the Connector, we need to have a GET method to populate the list of users from which the user can choose the task’s assignee and then we need a POST method to create the actual task. Though the URLs are different for the two requests, we can use the same connector for them by parametrizing the URL and set its values before calling the connector.
GET
To allow the user to select the assignee of the Asana task I am using a Data Page sourced by the REST Connector.
Here I am setting the parameters in the Request Data Transform for the Connector that will give us the details of the team members whose team ID is the middle parameter:
And here I am mapping the results, specifically the users’ names and IDs, in the Response Data Transform:
So far everything related to the Connector has been on the Int class but to actually use the Connector, I needed a new class on the Data class for the Data Page and to map the properties I need from the response.
Classes created on the Int class by the REST Connector wizard
Data-Asana class for implementing the integration
Once we have the Data Page we can use it anywhere, I personally put it as a Dropdown source in a section so the user can choose an assignee.
POST
I am using the PostAsanaTask activity on the Data class to call the Connector again to send a POST request to the Asana API to create a task.
Before calling the Connector, the URL parameters have to be set here too, as well as the body of the POST request.
After this, we can call the Connector:
Don’t forget about the error handling! 😉
The Result
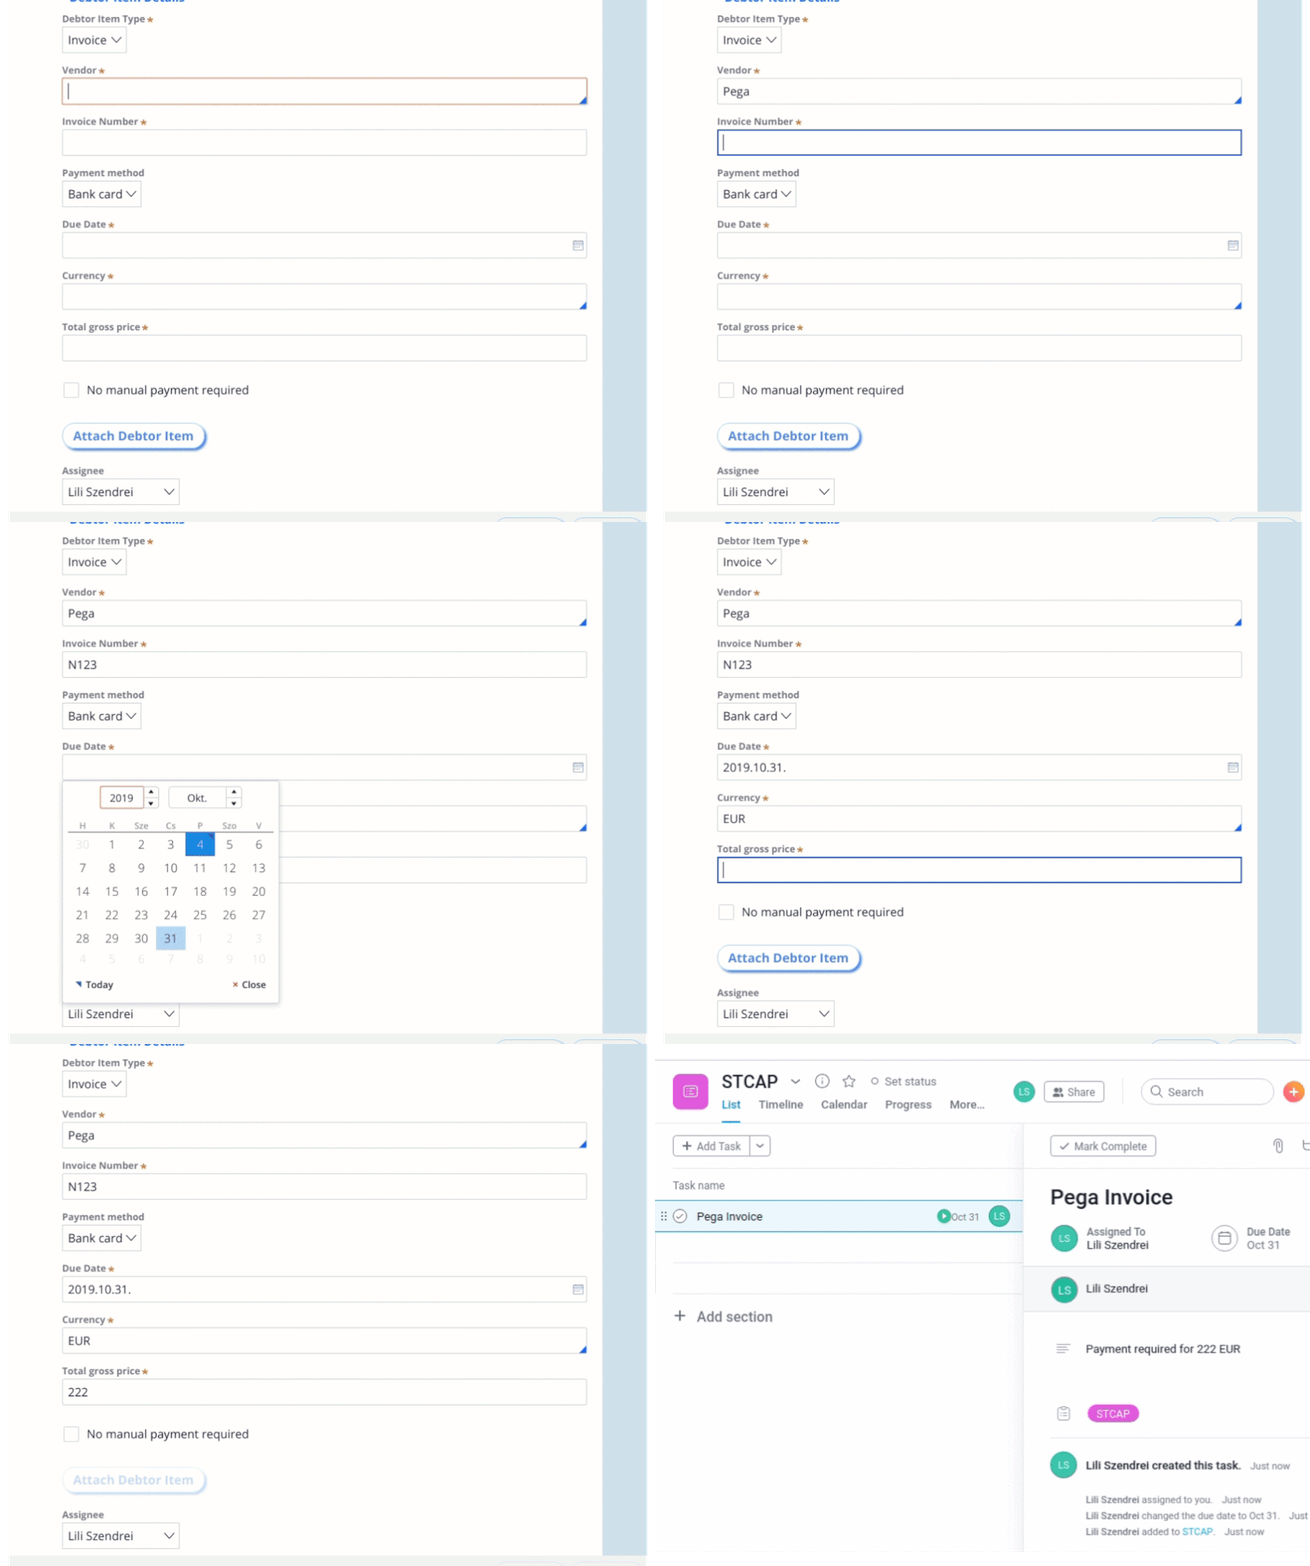
And here it is in practice:
We submit this form in the case and the task gets created in Asana with the same Vendor, Amount, Due Date, Currency and Assignee we set on the form:
Useful links:
Asana API: https://asana.com/developers/api-reference/tasks
Email to Asana: https://asana.com/guide/help/email/email-to-asana
OAuth 2.0 Grant types: https://oauth.net/2/grant-types/
Asana about Authentication: https://asana.com/developers/documentation/getting-started/auth


